Hardware Accelerated H.265 Streaming With FFmpeg
As covered in a previous post, FFmpeg is used at our church to transcode an RTSP stream and send that stream to an RTMP(S) ingestion endpoint. H.264 was previously being used as RTMP didn’t support any other modern codecs. This however changed with the new Enhanced RTMP standard which added support for VP9, H.265 (HEVC), and AV1 in the FLV container. FFmpeg subsequently added support for this new standard starting with the 6.1 release.
The PTZ camera we use supports both H.264 and H.265 encoding. By switching to H.265, we can substantially improve the quality of the outgoing stream without consuming any additional precious upload bandwidth which is quite limited due to our ISP. However, one caveat is that H.265 encoding is more compute intensive, and greatly benefits from hardware acceleration. Since we are streaming in real-time, it is important that we are enable to achieve a speedup of at least 1x when transcoding. This is challenging to do through software encoding, requiring us to add -preset ultrafast to the libx265 encoder. What we gain here in speed though we lose in bandwidth, with compression being very inefficient, defeating the purpose of using HEVC encoding in the first place. Luckily the CPU we use does offer hardware acceleration for HEVC encoding and decoding using Intel QuickSync!
The CPU in question:
$ lscpu
Architecture:             x86_64
  CPU op-mode(s):         32-bit, 64-bit
  Address sizes:          39 bits physical, 48 bits virtual
  Byte Order:             Little Endian
CPU(s):                   6
  On-line CPU(s) list:    0-5
Vendor ID:                GenuineIntel
  Model name:             Intel(R) Core(TM) i5-8500 CPU @ 3.00GHz
    CPU family:           6
    Model:                158
Here we can see the onboard graphics
$ lspci -nn |grep  -Ei 'VGA|DISPLAY'
00:02.0 VGA compatible controller [0300]: Intel Corporation CoffeeLake-S GT2 [UHD Graphics 630] [8086:3e92]
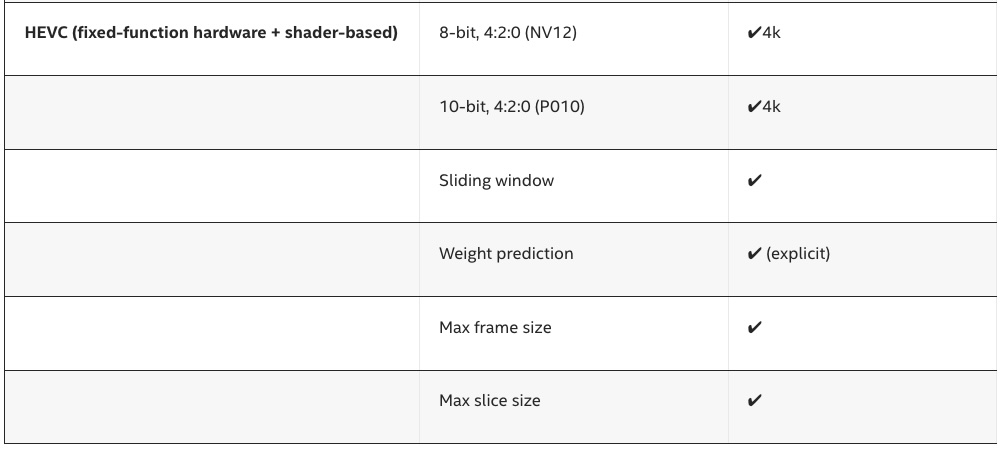
Looking at the documentation, we clearly see that HEVC encoding is supported in hardware, using both dedicated fixed-function logic and compute shaders on the GPU.

So far, so good. Let’s check to see the version of FFmpeg on Ubuntu 22.04.
$ ffmpeg
ffmpeg version 4.4.2-0ubuntu0.22.04.1 Copyright (c) 2000-2021 the FFmpeg developers
  built with gcc 11 (Ubuntu 11.2.0-19ubuntu1)
Oof, as mentioned before we need at least 6.1 but here we have 4.4.2. On Linux, you’ll usually rely on the version available through your distro’s package manager. There isn’t an official FFmpeg PPA or Snap or anything similar. The only remaining options are to use a static build or compile from source yourself. The semi-unofficial static builds linked to on the download page aren’t built with either libmfx or libvpl which are needed to use the qsv enabled encoders. This means we’ll need to buckle up and compile from source. Luckily, this is a straightforward process with all the necessary packages being available in Ubuntu’s vast repository. Simply follow the instructions on the FFmpeg build page.
This is the build script I used. I added flags to compile a static binary as I didn’t want to have to install the necessary libraries on the target machine. Also note the addition of --enable-libmfx which should be substituted with --enable-libvpl for newer hardware although you’ll also need a newer version of libva than what’s found in Ubuntu 22.04.
cd ~/ffmpeg_sources && \
wget -O ffmpeg-snapshot.tar.bz2 https://ffmpeg.org/releases/ffmpeg-snapshot.tar.bz2 && \
tar xjvf ffmpeg-snapshot.tar.bz2 && \
cd ffmpeg && \
PATH="$HOME/bin:$PATH" PKG_CONFIG_PATH="$HOME/ffmpeg_build/lib/pkgconfig"  ./configure \
--disable-shared --enable-static --prefix="$HOME/ffmpeg_build" \
--pkg-config-flags="--static"   --extra-cflags="-I$HOME/ffmpeg_build/include" \
--extra-ldflags="-L$HOME/ffmpeg_build/lib"   --extra-libs="-lpthread -lm"   --ld="g++" \
  --bindir="$HOME/bin"   --enable-libpulse --enable-gpl   --enable-gnutls \
  --enable-libaom   --enable-libass   --enable-libfdk-aac   --enable-libfreetype \
  --enable-libmp3lame   --enable-libopus      --enable-libdav1d   --enable-libvorbis \
  --enable-libvpx   --enable-libx264   --enable-libx265   --enable-nonfree \
  --enable-libmfx && PATH="$HOME/bin:$PATH" make -j8 && make install && hash -r
After compilation, we get a nice, fat 23MB binary. Let’s verify it has all the flags we expect.
$ ffmpeg
ffmpeg version N-116752-g507c2a5774 Copyright (c) 2000-2024 the FFmpeg developers
  built with gcc 11 (Ubuntu 11.4.0-1ubuntu1~22.04)
  configuration: --disable-shared --enable-static --prefix=/home/david/ffmpeg_build --pkg-config-flags=--static --extra-cflags=-I/home/david/ffmpeg_build/include --extra-ldflags=-L/home/david/ffmpeg_build/lib --extra-libs='-lpthread -lm' --ld=g++ --bindir=/home/david/bin --enable-libpulse --enable-gpl --enable-gnutls --enable-libaom --enable-libass --enable-libfdk-aac --enable-libfreetype --enable-libmp3lame --enable-libopus --enable-libdav1d --enable-libvorbis --enable-libvpx --enable-libx264 --enable-libx265 --enable-nonfree --enable-libmfx
Looks good! Now we just need to copy the binary over and install the Intel Media SDK on the target machine. Again note that newer Intel CPUs use oneVPL. Follow the instructions here for your Linux distribution and remember to add ${USER} to the render group so that you have access to the GPU under your current user (docs).
stat -c "%G" /dev/dri/render* # verify group
groups ${USER} # see groups user is part of
sudo usermod -a -G render ${USER} # add user to group if needed
Finally we adjust our FFmpeg command to look like the following:
$ ffmpeg -hwaccel_output_format qsv -c:v hevc_qsv -loglevel warning -xerror -rtsp_transport tcp -i {rtsp_address} \
  -f pulse -i {alsa_audio_source} \
  -map 0:v -map 1:a -c:v hevc_qsv -load_plugin hevc_hw -preset slow -global_quality 17 -g 120 -r 60 \
  -c:a aac -b:a 192k -ac 2 -ar 44100 -f flv -flvflags no_duration_filesize {ingestion_endpoint}
I determined a value of 17 for the global_quality param empirically, paying attention to the output’s bitrate. Using a preset of slow allows for better compression and is still plenty fast for real-time encoding.
And with that, we now have working hardware accelerated transcoding taking advantage of the dedicated hardware built into the CPU with no external GPU required. Pretty amazing actually!